ChatGPT
 Claude
To turn a photo into a vintage travel poster, upload your most recognisable shot of the place to an AI image-to-image tool and pick a poster era. Ask for the place name as a short title, then generate a few versions. The AI keeps the layout of the real place and redraws it in flat colour blocks, with a limited palette and big display lettering. Upscale the one you like before you print it.
Oakgen's vintage travel poster generator does this with four era presets, so you choose a style instead of writing a long prompt. Below is a real before and after, the settings we used, and what to watch for before you print.
Which tool fits your poster?
The pages ranking for this search on 2026-11-16 split into prompt guides and generator pages. Prompt guides like Lifehackedai's give you a long block to paste into ChatGPT or Gemini. Generators give you presets. Both work. The difference is control versus speed.
| Approach | Example | Best for | Weak spot | Cost note (2026-11-16) |
|---|---|---|---|---|
| Era-preset template | Oakgen Vintage Poster | Your own photo, four ready eras, no prompt writing | Fewer named styles than a custom prompt | 28 to 72 credits per render; paid plans only |
| Long paste-in prompt | Lifehackedai's 1950s prompt in ChatGPT or Gemini | Fine control over framing, palette and title | Long prompt to maintain; output varies by app | Depends on your chat app plan |
| Text-to-image with reference | MagicShot, Dreamina | Idealised posters from a place name | Less faithful to your exact view | Credit-based |
| Style generator with many presets | Lifehackedai Studio, Chat Smith | Many styles (woodblock, alpine, national park) | Less control over the exact output | Free beta or credit-based |
What we would do: if you have a photo of a real spot you visited, use an image-to-image template so the bell tower stays where it was. If you only have the name of the place, use a text prompt.
The Oakgen Vintage Poster template, in detail
These come from the template's definition in Oakgen's code, checked on 2026-11-16.
- Input: one photo.
- Era Style: Art Nouveau (1890s), 1920s Travel Poster, 1950s Advertising (the default), or 1960s Psychedelic.
- What the template asks the model for: a "limited color palette, flat design, and bold typography aesthetic", in a lithograph style. It tells the model to avoid photographic, modern and digital-gradient looks.
- Models: Nano Banana Pro (the default), Nano Banana 2, GPT Image 2.
- Estimated time: 8 to 12 seconds.
For a travel poster, switch the era from the default 1950s to 1920s Travel Poster. The 1950s preset is described as advertising, not travel.
You can set all of this on the tool page signed out. Open in Oakgen carries your photo and settings into the app, where generation needs a paid plan.
Real example: a harbour town, before and after
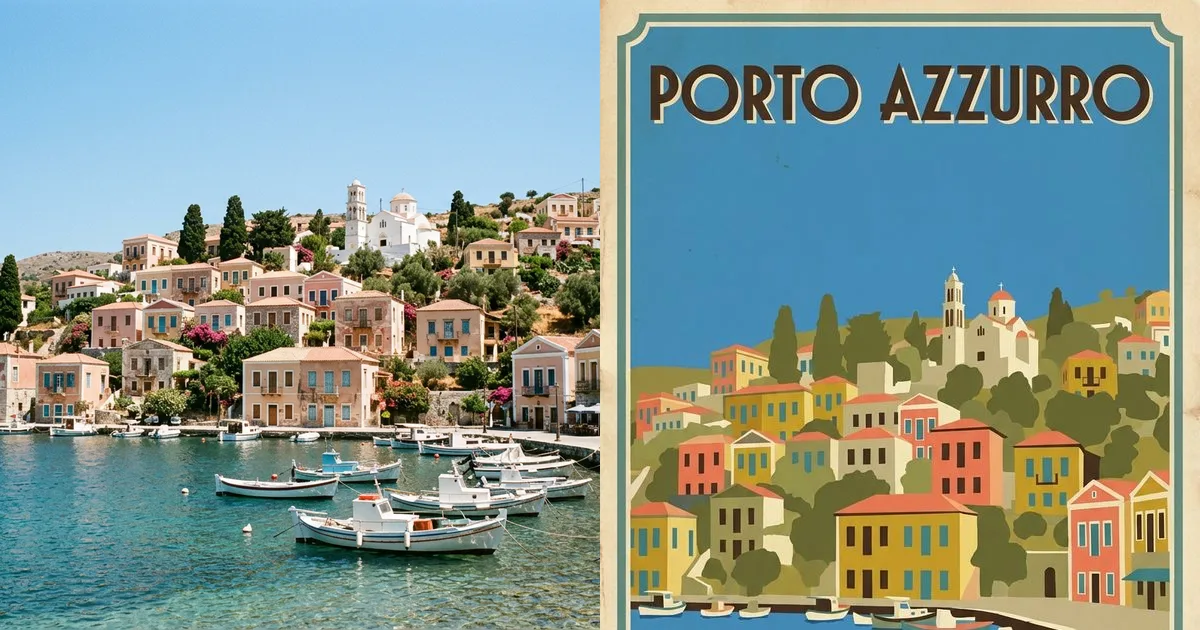
We generated a daytime photo of a fictional Mediterranean harbour town to use as the input. The town does not exist, so there are no landmark or rights questions. Then we ran it through the 1920s Travel Poster era on Nano Banana Pro at 1K, with one line of our own: "Add the title 'PORTO AZZURRO' in Art Deco lettering at the top."
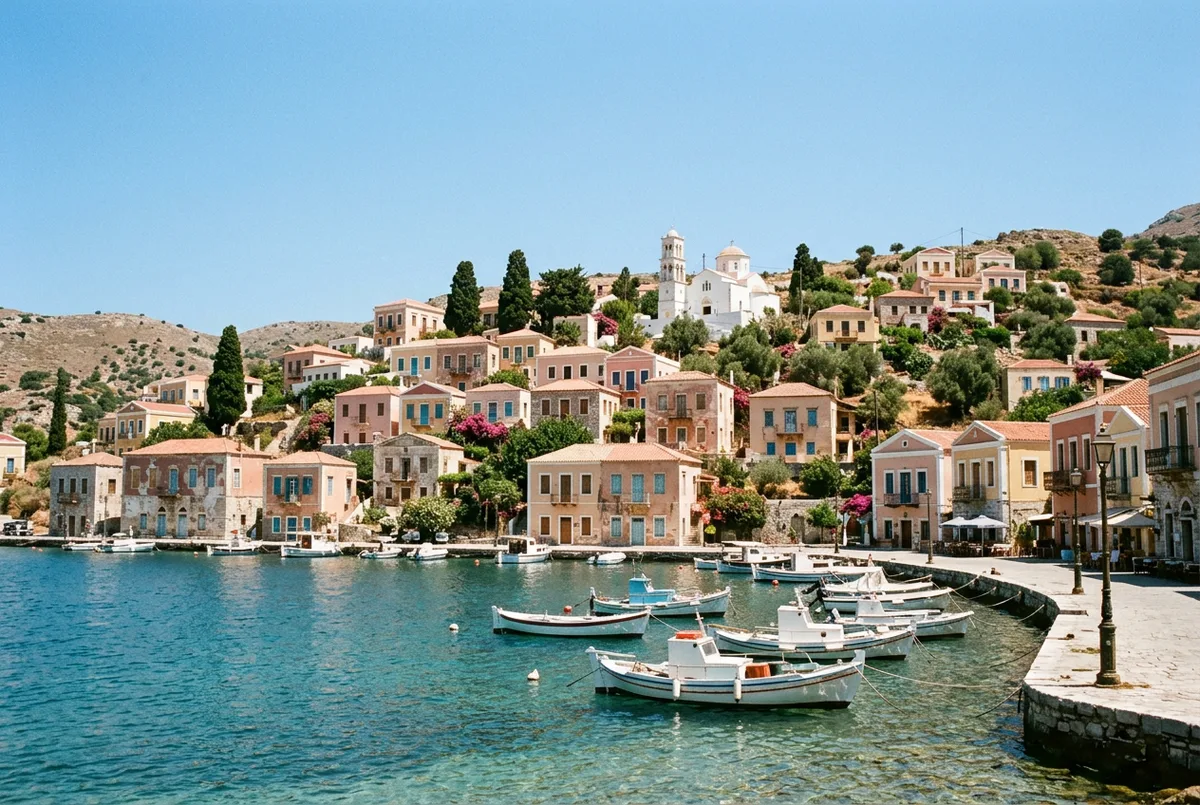
Input: an AI-generated photo of a fictional town.
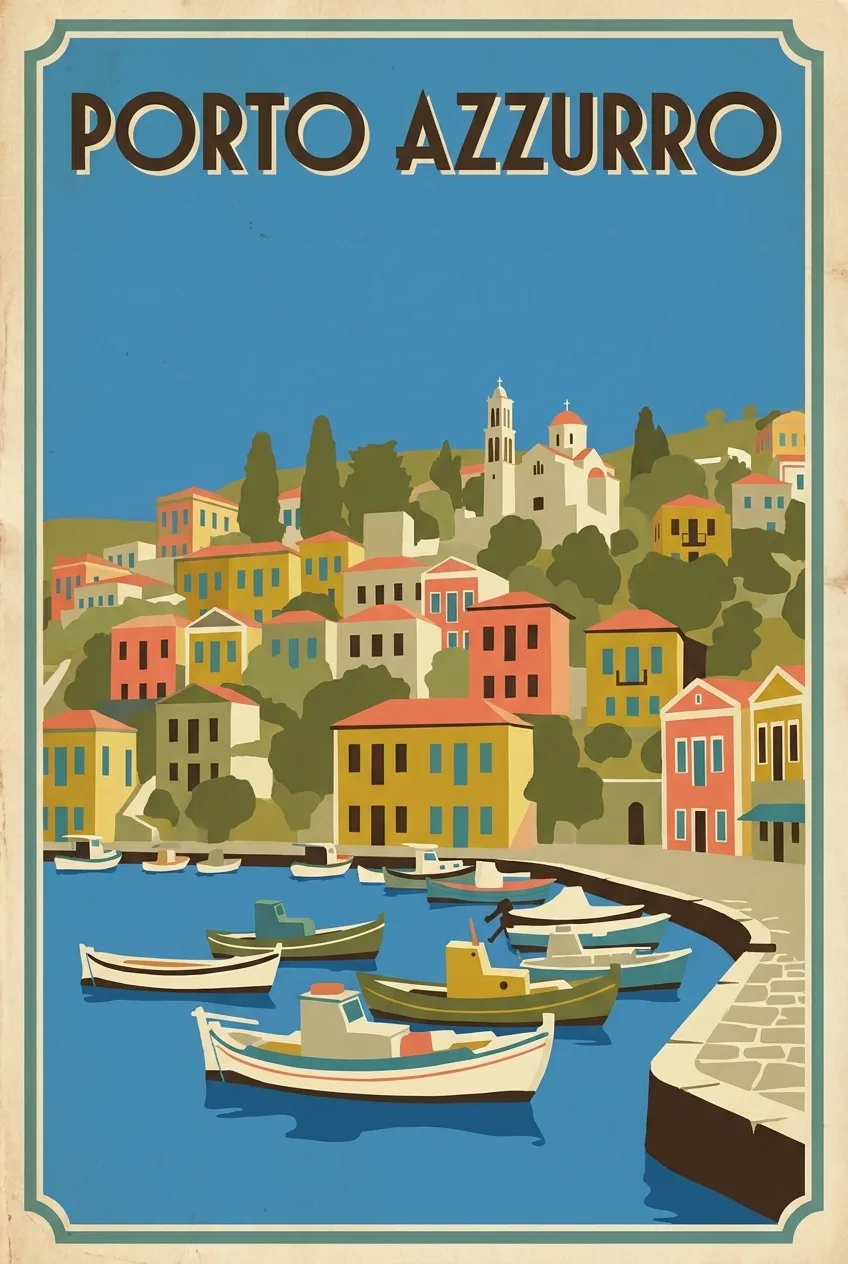
Output: 1920s Travel Poster era, Nano Banana Pro, 1K, 51 credits.
What held up: the layout survived. The bell tower, the curve of the quay and the boats are all where they were in the photo, and the title is spelled correctly. The palette dropped to a handful of flat colours, which is what makes it read as a poster rather than a filtered photo.
What we would change: the sky is one big flat block, so the top third is a little empty. For a print, we would ask for "a large sun low on the horizon" or move the title lower. That one extra line is the main thing worth adding to the template's prompt.
Turn your own travel photo into a poster. Use the shot people would recognise, not your favourite one.
Step by step
- Choose the most recognisable photo. A skyline, a coastline, a landmark. Posters were made to be read at a glance, so a clear silhouette beats a pretty detail.
- Shoot or crop to portrait. Most travel posters are tall. A tall input gives the model room for a sky and a title.
- Remove clutter first. Bins, scooters and tourists turn into odd flat shapes. Clean them out in the Oakgen image editor before you stylise.
- Pick the era. 1920s Travel for classic railway-poster geometry. Art Nouveau for curves and muted naturals. 1960s Psychedelic for festivals and music events.
- Add one line for the title. Put the name in quotes and keep it to one or two words.
- Generate two or three and compare. Use Nano Banana 2 for cheap variations, then render the keeper on Nano Banana Pro.
- Upscale for print. Run the final through the image upscaler. Our guide to upscaling AI images for print covers sizes and DPI.
Era cheat sheet
This is our own reference for choosing between the four presets.
| Era preset | Looks like | Use it for | One line to add |
|---|---|---|---|
| Art Nouveau (1890s) | Organic curves, ornate borders, muted naturals | Wine regions, gardens, spa towns | "Decorative floral border around the scene" |
| 1920s Travel Poster | Strong geometry, flat colour, bold sans-serif | Coastlines, railways, city skylines | "Title in Art Deco capitals at the top" |
| 1950s Advertising | Optimistic mid-century colour, friendly shapes | Diners, motels, beach towns, shops | "Bright sunburst behind the main subject" |
| 1960s Psychedelic | Swirling shapes, acid-bright palette | Festivals, gigs, music covers | "Wavy hand-lettered title" |
The real thing is worth a look before you start. The Library of Congress holds 907 original WPA posters from 1936 to 1943, and its travel and tourism set shows how much those designers simplified a scene.
Common mistakes
- Using the default era for travel. The default is 1950s Advertising. Change it to 1920s Travel Poster for the classic look.
- Long titles. "Welcome to Beautiful Porto Azzurro on the Coast" will break. "PORTO AZZURRO" will not.
- Busy photos. Every small object becomes a shape. Crop tight or clean up first.
- Printing the 1K file. It looks fine on a phone and soft on a wall. Upscale first.
- Copying a real artist's poster. Describe the style ("flat colour, limited palette") rather than naming a living artist or copying a famous poster. That keeps the work original.
- Expecting photo detail. Faces and small text get simplified. That is how the style works, not a bug.
What it costs
On 2026-11-16 at 1K, Oakgen's pricing returned 51 credits for Nano Banana Pro, 28 for Nano Banana 2 and 72 for GPT Image 2 per render. Higher resolutions cost more, and the tool shows the price before you run. Oakgen has no free plan; see pricing for current plans.
Related effects
If you want the same photo as an evening scene, see how to turn a day photo into night with AI. Then you can stylise the night version too. For a printed-press look instead of a poster, try the newspaper generator with photo. The Art Deco template is a close cousin for geometric styling. The AI photo effects guide maps the whole set.
Ready to frame something? Make a vintage travel poster from your photo on the 1920s preset and upscale the winner.
Frequently asked questions
How do I turn a photo into a vintage travel poster?
Pick your most recognisable shot of the place, upload it to an image-to-image tool such as Oakgen's Vintage Poster template, choose the 1920s Travel Poster era, and ask for the place name as the title in the optional prompt. Generate two or three versions, keep the best one, then upscale it before printing.
What is the best vintage poster generator?
For a poster built from your own photo, an image-to-image tool with era presets is the quickest, because it keeps the real landmark. Oakgen's Vintage Poster template has four eras: Art Nouveau, 1920s travel, 1950s advertising and 1960s psychedelic. If you have no photo, a text-to-image prompt in ChatGPT, Gemini or Dreamina can build an idealised version of the place from its name.
Can AI write the town name on the poster correctly?
Short titles usually come out right on current models. In our test, 'PORTO AZZURRO' rendered cleanly on the first try. Keep the title to one or two words, put it in quotes in the prompt, and check every letter before you print.
What resolution do I need to print a travel poster?
Aim for about 300 pixels per inch at the print size. An 18 x 24 inch poster needs roughly 5,400 x 7,200 pixels, so render at the highest setting you can and then upscale. A 1K render is fine for screens but too small for a large print.
Can I sell AI travel posters?
Oakgen's template page says eligible outputs can be used commercially under Oakgen's Terms and the model provider's terms. Avoid copying a specific artist's poster or a brand's logo, and check your marketplace's AI disclosure rules.
How much does it cost on Oakgen?
On 2026-11-16 at 1K, a render cost 51 credits on Nano Banana Pro (the default), 28 on Nano Banana 2 and 72 on GPT Image 2. Oakgen has no free plan.
Sources
- Oakgen Vintage Poster template definition (read 2026-11-16)
- Library of Congress, WPA Posters: About this Collection (read 2026-11-16)
- Library of Congress, WPA Posters: Travel and Tourism highlights (read 2026-11-16)
- Lifehackedai, How to Make a Vintage Travel Poster With AI (2026-06-04)
- MagicShot, AI Vintage Travel Posters of Places You've Actually Been (2026-08-10)
- Oakgen pricing (read 2026-11-16)