To upscale AI images for print, start with the print you want to buy. Find its physical dimensions and file requirements, crop your artwork to the correct ratio, and calculate the pixels needed. Then enlarge the approved image and inspect the details before ordering a sample. A bigger file can still contain wrong lettering, artificial texture, or a face that changed.
Oakgen's Image Upscaler uses Topaz for enlargement and enhancement. It can help with the pixel shortage. Your printer's template, finishing software, and a physical proof handle the rest of the production decision.
| What you have | First decision | Useful next step |
|---|---|---|
| Enough pixels, correct composition | Is the detail already good? | Keep the original; avoid unnecessary enhancement |
| Too few pixels, sound source | Does the required enlargement fit within 4x? | Test an upscale and inspect the result |
| Wrong shape for the print | What can be cropped without losing the subject? | Approve the crop before calculating enlargement |
| Garbled lettering or incorrect illustration | Is the source itself wrong? | Repair or replace it before enlargement |
| Small logo or typography | Is a vector master available? | Use that master instead of reconstructing letters |
Once you know the destination, open the upscaler with a copy of the approved image. Keep the source unchanged so you can compare the two.
Who this workflow helps
This guide is for artists preparing wall prints, creators ordering posters, and sellers delivering designs to a print-on-demand service. It also helps when a client asks for a physical version of an image originally made for a screen.
It is not a promise that any 512-pixel picture can become a convincing large print. Some sources simply do not contain enough trustworthy detail. Knowing when to stop is part of preparing a usable file.
Research note, October 7, 2026: This guide uses Oakgen's current Topaz configuration and official printer and Adobe documentation. The calculations and diagrams are worked instructional examples, not a measured upscaler benchmark or a physical print test. The cover is editorial artwork.
Start with the destination, not “4K”
“4K” describes a pixel-dimension convention, not a physical print size. It does not tell you whether an image fits a particular frame, shirt print area, or poster template.
Before generating or enlarging anything, record:
- the exact product or print service;
- the intended finished dimensions;
- the required image ratio and usable print area;
- the destination's resolution recommendation;
- bleed, trim and safe-area instructions;
- accepted file format and color-profile requirements.
Download the current template if the printer provides one. A wraparound mug design, a framed art print and a full-bleed poster have different layout problems. The same file should not be assumed to fit all three.
Printify's file guide recommends 300 DPI for many JPEG/PNG uses but describes lower requirements for some large products. Its product-specific print areas are the practical authority. Printful's preparation guide likewise directs users to the requirements of the chosen product. Do not apply a universal resolution rule where a specific template exists.
Pixels, PPI and DPI: the useful distinction
Pixel dimensions are the image's width and height in pixels. They describe how much raster information is available.
Pixels per inch, or PPI, describes how densely those pixels are placed at a chosen physical size. An image 2400 pixels wide placed eight inches wide provides 300 pixels per inch.
Dots per inch, or DPI, describes printer output. Print services often use “DPI” when asking customers for image resolution. Follow their instructions, but do the source-size calculation using image pixels and physical inches.
The core calculation is:
Required pixel width = print width in inches × target PPI
Required pixel height = print height in inches × target PPI
Adobe explains the relationship between print size, resolution and resampling. Changing a resolution number without adding pixels changes the relationship to physical size; it does not recover more image information.
For example, a 1200 × 1500 image provides 150 PPI at eight by ten inches. Relabeling it “300 DPI” does not turn it into 2400 × 3000 pixels. A 2x enlargement would create those dimensions, but the resulting detail still needs review.
A copyable print-size table
The table below uses 300 PPI as an illustrative target, not a requirement for every printer. It describes the finished image area without extra bleed. When a template requires bleed, calculate the full canvas from that template instead.
| Finished image area | Ratio | Pixels at 300 PPI |
|---|---|---|
| 5 × 7 inches | 5:7 | 1500 × 2100 |
| 8 × 10 inches | 4:5 | 2400 × 3000 |
| 8 × 12 inches | 2:3 | 2400 × 3600 |
| 12 × 16 inches | 3:4 | 3600 × 4800 |
| 16 × 20 inches | 4:5 | 4800 × 6000 |
| 18 × 24 inches | 3:4 | 5400 × 7200 |
Keep orientation consistent when using the table. A landscape print uses the same values with width and height exchanged.
If your destination specifies 200 PPI, an eight-by-ten-inch image area requires 1600 × 2000 pixels. If it specifies millimeters, convert each dimension to inches by dividing by 25.4 before multiplying by PPI. Confirm rounding and canvas dimensions against the actual template.
Crop first: the pixels you remove no longer count
A square image does not fill a portrait print without a choice. You can crop, add a border, or create a new composition. Each produces a different finished object.
Here is a worked crop for an eight-by-ten print:
- Start with a 1024 × 1024 square source.
- Choose a 4:5 portrait crop that preserves the important subject.
- Retain 819 × 1024 pixels, a near-4:5 integer crop.
- Compare that cropped source with the 2400 × 3000 target.
The width needs approximately 2.93x enlargement, and the height needs approximately 2.93x. A 3x pass yields 2457 × 3072 pixels. That gives a little margin for a precise final crop or resize to 2400 × 3000.
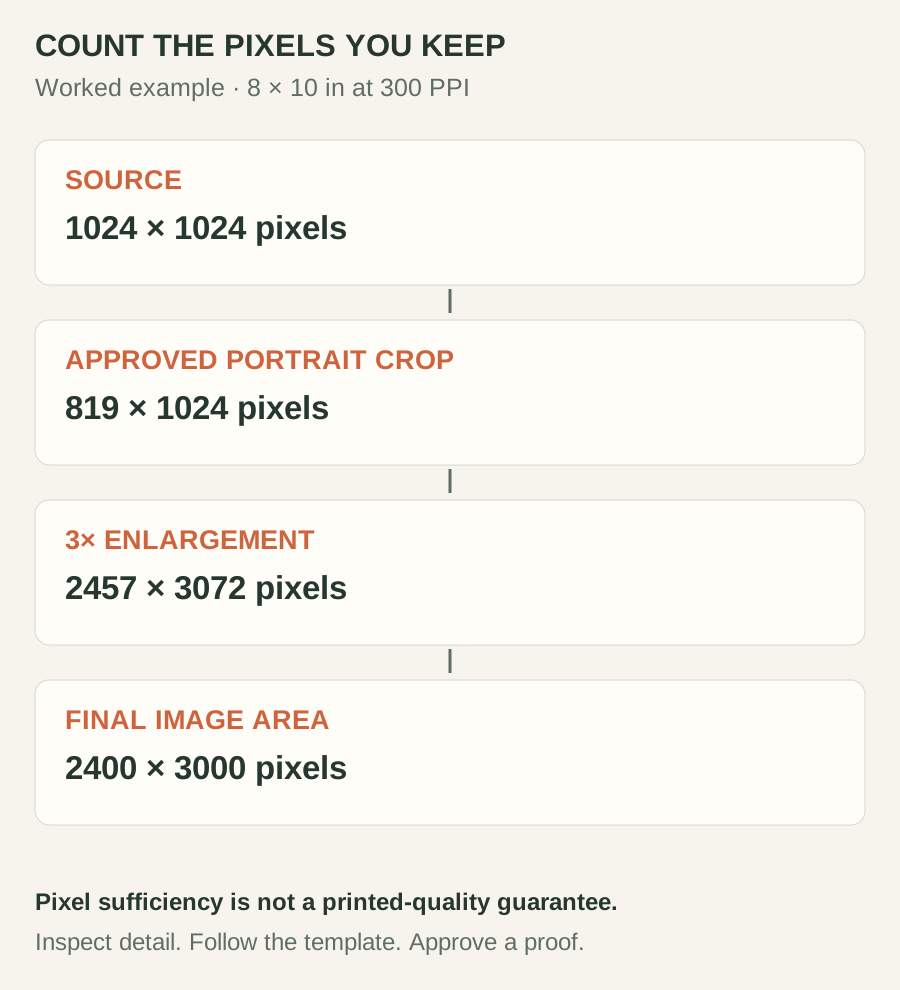
This diagram explains the arithmetic. It does not show a Topaz output or establish printed image quality.
If the crop removes the artwork's border or cuts through the subject, do not force it. A white margin may be the better design. Reference editing in Oakgen's Image Editor can explore a different composition, but generated additions need their own review. It is not a substitute for preserving exact original artwork.
Calculate whether enlargement is enough
For a cropped source, calculate both ratios:
Width factor = target pixel width ÷ cropped source width
Height factor = target pixel height ÷ cropped source height
Required factor = the larger of those two values
Choosing the larger value prevents one edge from remaining too small. If the ratios differ substantially, the source and destination probably have different aspect ratios. Solve that composition problem before upscaling.
Example A: the source fits the supported range
For the 819 × 1024 crop above, a 3x pass provides sufficient dimensions for an eight-by-ten-inch image at the illustrative 300 PPI target. Select an appropriate enhancement mode, generate a candidate, and inspect it. Enough pixels is the first gate, not the last one.
Example B: a larger print exceeds one pass
That same crop needs 4800 × 6000 pixels for a sixteen-by-twenty-inch image at 300 PPI. The required factor is approximately 5.86x. Oakgen's Topaz field accepts 1–4x, so a single pass cannot reach those dimensions.
At 4x, the file becomes 3276 × 4096. That supplies approximately 205 PPI at sixteen by twenty inches. Whether that is acceptable depends on the printer, medium, viewing distance and actual detail. It is not automatically a failed print, and it is not automatically a successful one.
Practical alternatives are a smaller print, a larger original source, a border that reduces the artwork area, or a destination that explicitly accepts the lower resolution. Repeatedly enlarging already reconstructed detail does not prove that the artwork becomes more faithful.
Enlarge the approved crop
Use the pixel calculation to choose a scale factor, then compare the result with your unchanged source.
Choose the Topaz controls for the actual image
Oakgen currently retains Topaz Upscale in the image-upscaler catalog. Its exposed controls include enhancement mode, scale factor, output format, face enhancement, face enhancement strength and subject detection. Do not follow an old tutorial that tells you to select Crystal or Clarity there.
The enhancement-mode choices are Low Resolution V2, Standard V2, CGI, High Fidelity V2, Text Refine, Recovery, Redefine and Recovery V2. Start with one mode that fits the source and compare the result. A mode's name is not an acceptance certificate.
For illustration or rendered imagery, CGI is a sensible candidate to test. For ordinary photographs, start with Standard V2 or compare High Fidelity V2. For damaged material, a recovery mode is a candidate, but missing detail remains inferred. When typography matters, Text Refine still requires character-by-character inspection.
Use the smallest factor that meets your destination. Set JPEG or PNG according to the downstream requirement. If no faces need enhancement, turn face enhancement off. If a portrait changes identity, reject that pass rather than assuming a sharper face is a better face.
Keep the first comparison simple: same source and factor, one changed enhancement mode. Changing every control simultaneously makes it difficult to understand why the result improved or broke.
Inspect details at full size and at physical size
Zooming out can hide defects. Inspect the source and enlarged result at comparable areas, then view the complete artwork at its intended physical size in your layout software where possible.
| Check | What would make me reject the file? | Better next action |
|---|---|---|
| Exact lettering | Changed spelling, missing punctuation or merged strokes | Restore approved text in a deterministic editor |
| Illustration | Added petals, extra lines or changed geometry | Compare a gentler pass or use a larger original |
| Face | A different expression or unfamiliar facial detail | Reduce/disable face enhancement and compare |
| Fine texture | Repeated artificial patterns or a waxy surface | Test another mode or keep more source texture |
| Edges | Bright halos, doubled outlines or jagged diagonals | Reduce aggressive enhancement or repair externally |
| Crop | Cut-off artwork, unexpected borders or lost subject | Revisit composition before another generation |
Inspect representative detail regions, not only the most flattering area. A clean sky does not establish that a sign or a face is accurate. For commercial product artwork, use the stricter logo and label preservation checks.
If you have the vector master for a logo or a typographic poster, use it. Generating and then repairing exact lettering is often unnecessary work. Keep editable type and source illustration layers until the final export.
Finish the production file outside the upscaler
The upscaler produces an enlarged image. It does not verify the printer's bleed, color profile, trim, safe area, packaging or proof.
Open the result in an editor that handles the destination's template. Set exact canvas dimensions and position the artwork. Retain required margins, add bleed only as instructed, and use the printer's requested profile and format. Do not convert to an arbitrary profile simply because someone calls it “professional.”
PNG is useful when the destination accepts it and you want a lossless raster file. JPEG may be appropriate when the printer requests it. Transparent apparel artwork has different needs from an opaque photographic poster; do not assume an upscale preserves or creates the transparency your product requires.
For Etsy, keep this production file separate from the listing mockup. One makes the product; the other describes it to a buyer. Our Etsy mockup workflow explains how to review that representation without letting AI redesign the item.
Copy this print preflight worksheet
| Field | Record for your order |
|---|---|
| Printer and exact product | Name, product ID and current template |
| Finished artwork area | Width × height, with units |
| Required full canvas | Include destination-specific bleed if required |
| Target resolution | Printer's stated requirement or approved target |
| Required pixels | Width × height after conversion |
| Approved source | Filename/version and original pixel dimensions |
| Retained crop | Actual remaining pixel dimensions |
| Required factor | Larger of width factor and height factor |
| Generation settings | Mode, factor, format and relevant enhancement controls |
| Detail review | Text, geometry, faces, texture and edges pass/fail |
| Final export | Filename, dimensions, format and profile |
| Physical proof | Ordered, inspected and approved by whom |
You can download the blank worksheet and use one row per image. A record makes a repeat order easier because you know which file was actually approved.
When choosing a fresh image, Image Arena can help compare candidates before you invest in finishing. That comparison is separate from verifying how a particular candidate prints.
The mistakes that waste print orders
Upscaling the wrong source. Look for the original download before enlarging a screenshot or compressed social-media copy. Better source pixels can matter more than an aggressive repair.
Using the whole canvas in the calculation. If the final crop removes a quarter of the image, those discarded pixels do not contribute to print resolution.
Fixing spelling after enlargement. Repair source text first, or preserve it in a separate editable layer. Enlarging a wrong word produces a bigger wrong word.
Treating a green upload indicator as a proof. It may confirm a file property. It does not establish that the printed color, material, detail or design placement meets your expectations.
Ordering the whole batch before a sample. Review one representative physical print, especially when changing the printer, medium or image-processing settings. An untested workflow should not become a bulk order by accident.
FAQ
How do I upscale AI images for print?
Choose the physical print size and the printer's requirements, crop the image to the right ratio, calculate the required pixel dimensions, and compare them with the cropped source. Upscale only as much as needed, inspect important details, and approve a physical proof before a production order.
Does changing an image to 300 DPI improve its quality?
Changing resolution metadata without resampling does not add pixels or recover detail. Calculate the pixels needed at the intended physical size, then enlarge the image if necessary. The printer's actual requirements determine the target.
How many pixels do I need for an 8 by 10 inch print?
At a target of 300 pixels per inch, an 8 by 10 inch print needs 2400 by 3000 pixels before any additional bleed. If your printer specifies a different resolution or template, use that instead.
Can Oakgen make every small image print-ready?
No. Oakgen's Topaz upscaler supports a 1–4x enlargement factor, and added pixels do not establish that fine detail is accurate. A source may need a smaller print size, a higher-resolution replacement, or manual repair.
Should I upscale before or after cropping?
Decide the final composition first and calculate from the pixels that remain after cropping. You can crop in an external editor before upscaling. If you upscale first, account for the later crop rather than treating the entire enlarged canvas as usable print area.
Can I upscale text and logos with AI?
You can test it, but inspect every important letter and shape against the approved source. Exact text, logos and fine linework are often better retained as vector artwork or added in a deterministic editor rather than regenerated.
Prepare one image for one real print
Start with your intended dimensions, enlarge only as needed, and keep the source beside the result for review.