Useful AI product mockups for Etsy start with the design you actually sell. Upload an accurate product photo or your approved artwork, request a limited scene change, then compare the result against the source. A beautiful room does not rescue a print with changed lettering. A convincing mug does not rescue a design wrapped around the wrong side.
Before generating, decide whether that image belongs in your listing. Etsy has different rules for actual-product photos, personalized items and certain production-partner mockups. Those distinctions matter more than how realistic a render looks.
Oakgen's Image Editor can help you explore reference-based scenes. The workflow below turns that exploration into a reviewable image set, with a clear stopping point when exact artwork needs manual compositing.
Start with one image: open Image Editor, load your actual product source, and test one background change before planning a whole listing.
Choose the source before choosing the scene
| What you have | Sensible starting point | Main thing to check |
|---|---|---|
| A real finished product | Your own clear product photograph | Shape, surface, color and condition remain accurate |
| Artwork printed onto a base product | Exact artwork plus an approved product photo or mockup | Print placement and the base product match what is supplied |
| A personalized item | A finished customized example | The first-image rule and the actual customization options |
| A digital download | The actual file or accurate preview | The buyer can tell what is included and what is decoration |
| Only a description of the design | Make or retrieve the artwork first | A new interpretation is not the original design |
This guide is for sellers preparing listing visuals, especially prints, mugs, apparel and digital products. It does not cover manufacturing files or automatic Etsy publishing. For preparing the artwork itself for a physical print, use the separate AI image print-preparation guide.
Research note, October 7, 2026: Etsy policy and image guidance were checked against the official sources linked here. Oakgen instructions were checked against the current editor configuration and submission behavior. The example artwork and diagrams are instructional assets; they are not evidence of a tested model result, sales lift or Etsy approval.
Check the listing-image rules first
Etsy's Listing Image Requirements generally require original photos showing the actual product, with limited exceptions. For an original design printed onto a base item by a production partner, the policy permits stock-photo mockups. That exception does not explicitly authorize every AI-rendered product scene.
Personalized items have a separate boundary: show a finished customized example first; computer-generated supporting images can demonstrate customization options. The personalized-listing guide explains this distinction.
If the rule is unclear, keep the real product photograph and resolve it before replacing the image.
Also separate how the item was created from how it is pictured. Etsy's Creativity Standards require a listing-description disclosure for items created using AI. An AI-created illustration sold as a print raises that requirement; an AI-generated setting around existing artwork is a different case. Neither question excuses an inaccurate product image.
Build a small source pack
Keep the original artwork separate from listing exports. Name the files so you can trace every scene back to one approved version:
sunday-studio-artwork-v1.png
sunday-studio-real-print-front.jpg
sunday-studio-scene-desk-attempt-01.png
sunday-studio-scene-desk-reviewed.jpg
For a physical item, photograph the actual product. Show the whole design without reflections or an angle that hides important details.
For artwork, use a clean export. Keep the layered or vector master locally; make a separate flattened upload copy if needed.
Write down the facts that cannot change: product material, dimensions, color, print area, lettering and illustration elements. Add the buyer-facing facts too: whether the frame is included, which side of a mug is printed, or whether a shirt has front and back artwork. These facts guide both generation and rejection.
Make decorative props clear: a framed scene must not imply that a frame ships with an unframed order.
A worked brief: the SUNDAY / STUDIO print
Here is a simple fictional design you can inspect without relying on subjective resemblance.

Original instructional artwork. Download the source artwork to study the details. Export a PNG copy in a graphics editor before using it as a model input; the SVG shown here is not a tested generation upload.
Suppose the product is an unframed paper print. For practice, the brief specifies two lines reading SUNDAY and STUDIO, one orange sun, and three blue arcs. The slash in the example name separates the lines; it is not printed lettering.
Create a short truth sheet:
| Detail | Required result | Reject when |
|---|---|---|
| Lettering | SUNDAY above STUDIO | A letter is changed, dropped or added |
| Sun | One orange sun | Extra suns appear or its color changes materially |
| Arcs | Exactly three blue arcs | An arc disappears, doubles or changes into a wave |
| Layout | Same relative positions and proportions | Elements move or the artwork stretches |
| Product | The specified paper print | It becomes canvas, a framed bundle or a different size |
| Offer | Unframed print only | The scene suggests decorative accessories are included |
Reuse this format with facts about your own item.
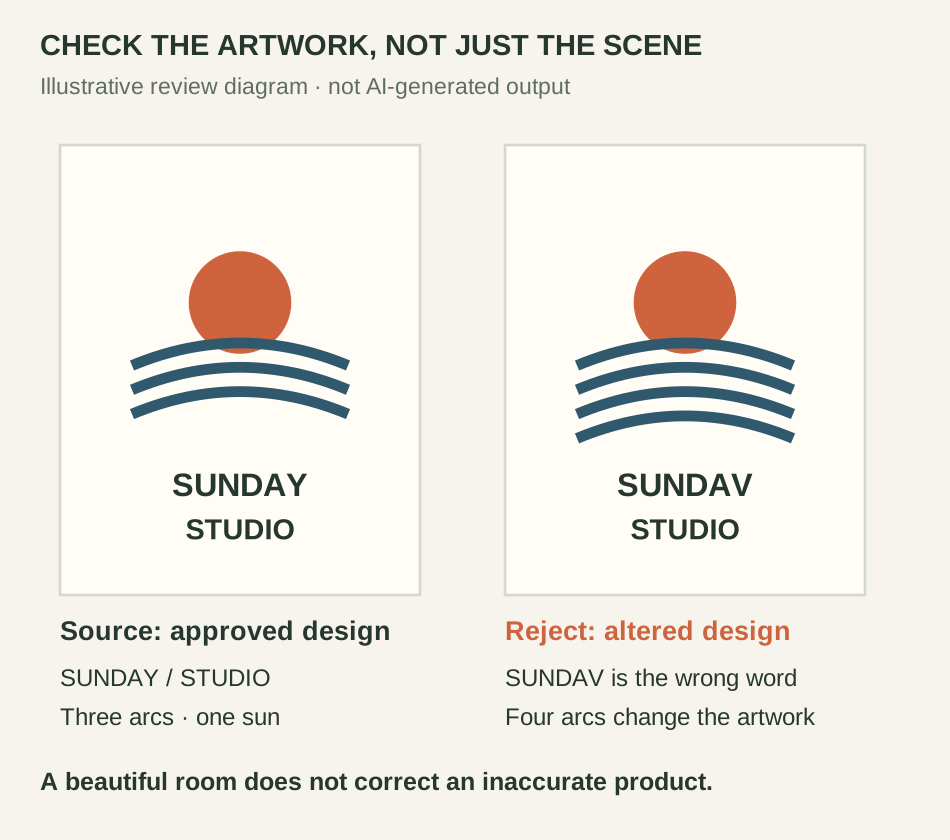
Illustrative review diagram, not AI-generated before-and-after evidence. It shows the kinds of changes to inspect; it does not demonstrate that an Oakgen model passed the checks.
Make one controlled edit in Oakgen
Load your source in Image Editor. For a physical product, use the accurate product photograph as the main image. A flat artwork file alone gives the model fewer facts about the actual product.
Choose Nano Banana Pro Edit as one available reference-edit option. This is an exercise, not a ranking. Its current editor settings include Aspect Ratio, Resolution and Output Format. The editor also offers optional references through Add Image. With this model, the main image and added references are sent together; support differs when you choose another model.
If adding the artwork file, tell the model which input supplies the product and which supplies the design. Leave out unrelated style references on the first attempt. Otherwise, you may spend time diagnosing whether the product changed because of the instruction or because a reference suggested a different look.
Open Additional Settings and choose a frame that leaves room around the whole product. A landscape 4:3 frame suits this exercise. Leave space around the product so thumbnail crops do not hide its edges. Choose a resolution for review and a supported output format. Check the displayed credit estimate before submitting.
The editor uses written edit instructions. Do not assume a prompt creates a protected layer or a locked design region. The instruction describes what you want; the result still needs inspection.
Test one scene against your source
Upload an accurate product image, describe a limited change, and compare the result before generating more variations.
Instructional prompt: a simple desk scene
Use this only after checking the image's intended listing role. Replace the product facts with your own. The text is a brief to test, not a promise of preservation.
The main image shows the product. Any additional artwork reference
shows the exact design to preserve.

Place the same unframed paper print on a plain light-wood desk,
photographed nearly straight on. Add soft daylight from the left.
Keep the full print visible with generous space around its edges.

Preserve the artwork: SUNDAY on the first line, STUDIO on the second,
one orange sun, exactly three blue arcs, and the same layout.
Keep the paper proportions, printed colors and material unchanged.
Do not add lettering, a frame, a watermark or extra products.
Only change the setting and its lighting.
Save the prompt and settings. Review before changing the angle or adding more products.
Compare details, then judge the scene
Open the source and candidate side by side at full size. Start with the truth sheet, not whether the scene feels premium.
Read text character by character. Count illustration elements. Compare the margins, aspect ratio and relative placement. Inspect print boundaries and the product silhouette: a straighter mug handle or heavier paper border may still misrepresent the item.
Check shadows, reflections and surfaces. Is the print visible enough to understand? An attractive setting can still make the design unreadable.
Review at small listing-preview size too. Full-size inspection catches changed details; a small preview tests whether buyers can identify the item.
Reject failed candidates. Continuing to edit them can compound the changes. Return to the original source and retry with a simpler request.
Set an attempt budget before starting. When repeated attempts keep altering important details, move to a workflow that retains the original artwork as a separate layer. More retries are not a fidelity strategy.
For a deeper text check, use the logo and label preservation guide.
When exact compositing is the better choice
For flat art prints, a layered mockup is often easier to control. Create or obtain a suitable scene, then place the original artwork into the frame or paper area in Photoshop, Affinity, Photopea or another layer-based editor. Transform the artwork to the scene perspective and inspect its edges.
That is an external finishing step. Oakgen's reference editor does not guarantee deterministic artwork compositing. Layer placement lets you retain the original file, but the scene still needs truthful scale, product appearance and disclosure of excluded props.
Mugs and apparel are harder because curved surfaces and folds distort the printed design. Use a mockup template matched to the actual base item or photograph a real sample. A generic shirt scene cannot establish the fabric weight, stitching, fit or print quality of your supplier's product.
Keep printer artwork separate from listing scenes.
Three supporting-scene briefs to adapt
These instructional prompts are untested. Start from the approved product source and retain the desk prompt's preservation paragraph.
| Scene | Instruction to add | Review focus |
|---|---|---|
| Clean detail view | Use a plain neutral setting, nearly front-on framing and even light; show the whole design | Every letter and illustration element is visible |
| Seasonal supporting scene | Add a small pine sprig beside the product and warm window light; keep props away from the print | Seasonal decoration does not change the product or imply a bundle |
| Workspace context | Place the print on a tidy desk beside a closed notebook; keep the product dominant | Props do not obscure details or make the size appear misleading |
Avoid invented close-ups of materials or print finishes. Show a real detail photograph when buyers need evidence of texture or quality. For size, use dimensions you have measured and an accurate diagram, rather than treating generated props as reliable scale references.
Ready for a second scene? Reuse your original product source in Image Editor and change only the setting. Keep both attempts until you finish the fidelity check.
Give each listing image a job
Etsy's listing guide currently allows up to 20 photos and two videos. You do not need to fill every slot. Plan a set that answers the questions buyers would otherwise message you about.
| Image job | What to show |
|---|---|
| Identify the item | A clear, policy-appropriate first image |
| Verify the design | An accurate close view of the finished product or file |
| Explain the options | Available colors, customization or versions, clearly labeled |
| Explain size | Measured dimensions and an accurate size guide |
| Explain the purchase | Included files or physical items, and excluded accessories |
| Show context | A reviewed supporting scene where its use is appropriate |
Before uploading, check dimensions and crops. Etsy recommends at least 2000 pixels in both width and height for listing photos. That is a recommendation, not a reason to stretch a small file or declare every export compliant. The same guidance says transparent PNG areas appear black, so flatten listing images onto the intended background.
Preview the thumbnail inside Etsy after upload. Keep critical details away from edges, and make sure an automatically cropped image still shows the item. Write descriptive alt text for what is actually visible; do not pack it with unrelated search terms.
Copy this release checklist
Download the mockup review worksheet to record the source, requested edit, fidelity checks, and release decision for each image.
PRODUCT AND RIGHTS
[ ] The source depicts my actual product or approved design.
[ ] I have rights to the artwork, photos and mockup assets.
[ ] I checked the rule for this item and each image's role.
[ ] AI-created-item disclosure is handled when applicable.

FIDELITY
[ ] Every letter matches the source.
[ ] Illustration elements, colors and placement match.
[ ] Product material, shape and variant remain accurate.
[ ] Included items and decorative props are distinguishable.
[ ] The source and reviewed export are saved separately.

DELIVERY
[ ] Image dimensions and listing crops are checked.
[ ] Transparent areas are flattened appropriately.
[ ] The set answers design, size and purchase questions.
[ ] A second reviewer checked anything I might overlook.
A failed product check means correction or replacement, even when the image looks better than the source.
Frequently asked questions
Can I use AI-generated mockups in an Etsy listing?
Check the rules for your item and each image's role first. Etsy generally requires original photos of the actual product, with specific exceptions. Permission for stock mockups or supporting customization images is not blanket permission for arbitrary AI product renders.
Can a personalized item's first image be a blank mockup?
No. Etsy requires the first image to show a finished, customized item similar to what buyers will receive. Blank products and placeholder-text mockups should not be the main image.
How do I stop AI from changing my artwork?
Supply the actual artwork or an accurate product photo, request a limited scene change, and compare every result against the source. If lettering or illustration details still change, use the original design in an external layered mockup or photograph the real product.
Does Oakgen place my design onto a product pixel-perfectly?
Oakgen offers reference-image editing with written instructions. It does not guarantee pixel-perfect design placement. Review the result, and use an external editor when you need exact artwork compositing.
Do I need to disclose AI use on Etsy?
Etsy's Creativity Standards require disclosure in the listing description when the item itself is created using AI. That is a different question from using AI to make a listing background; the listing-image rules still need to be checked separately.
How many images can I add to an Etsy listing?
Etsy's current listing guide allows up to 20 photos and two videos. Use the slots to answer buyer questions about the actual item, rather than filling them with near-identical AI scenes.
Make a mockup you can check
Start with the real product or approved artwork, create one scene, and compare it against your source before building the listing set.